pop up description layer
HOME
Cryptozoology UFO Mysteries Aviation Space & Time Dinosaurs Geology Archaeology Exploration 7 Wonders Surprising Science Troubled History Library Laboratory Attic Theater Store Index/Site Map Cyclorama
Search the Site:
|


|
x
Need a great science or art project for school? Or maybe something to just liven up your den or bedroom? With a little cardboard, paints, a glue gun and some elbow grease you can build a replica mummy complete with case... Note: If you plan to make both the mummy and the mummy case, make the mummy first. You can then use the mummy to figure out how large the mummy case should be. Before you start we recommend you read all the instructions (all three pages) so you can get a feeling for the scope of the project. Making the Mummy: Supplies: (6) 20"x30" light poster boards, two rolls of inexpensive masking tape 2"x60', white glue, old newspaper and scissors. You will be making the mummy by copying the shape of a volunteer by making tracings of his (or her) body. The tracings are turned into cross-sections and assembled to make a body shape. Then you will be wrapping it in masking tape which is meant to mimic the long cloths used in wrapping mummies. These supplies are enough to make a mummy up toa height of 60". Make the long poster board. STEP 1: Lay the newspaper out on your working surface so that you do not have to worry about getting glue where it does not belong. STEP 2: Lay one of the poster boards out on the surface. Cover it with a thin film of white glue. Then take another poster board and lay it on top of the left half of the first one as shown in the diagram. Take a third poster board and use it to cover the right half of the first. Press down on the boards so they make a good seal. Then let this dry. STEP 3: Flip over the three glued poster boards. Cut a fourth poster board in half so that each part will cover one section of the glued board that are still of single thickness. Then use white glue to adhere these to those areas. When you are done you should have a double layer poster board 60" long by 20" high. STEP 4: Finally glue the remaining two poster boards together to get a single 30" by 20" board of double thickness. Create a Body Shape STEP 5: Have your volunteer lay down on the floor with his/her arms crossed over their chest in mummy style. Have someone hold the long poster board next to them in a vertical position. Use a pencil to trace the rough shape of the person at their mid-line onto the poster board. Head should be at one end, feet at the other. If the person is slightly taller than the poster board you can shift it when you get to the area of the legs and continue drawing. This may result in a mummy with slightly shorter legs than your volunteer, but it will not be very noticeable. Check the diagram to see how this tracing should be done. When you are sure you have the tracing right, use the scissors to cut it out.
STEP 7: Use the last tracing (shoulder to feet) and a pencil to trace that shape onto what is left of the long poster board. Cut that out. When you are done you should have three cross sections running from the head or shoulders of the volunteer to his feet. We will refer to these as the "vertical" cross-sections. STEP 8: Use the 30" by 20" poster board to make cross sections of your volunteer that run across their body from left to right. To do this you can simply hold the poster board over their body and mark the width and height of their body at each location. Then draw an oval using those markings as the outer perimeter. Do a cross section at the shoulders, chest, waist, thigh, knees, calves and feet. You may need what is left of the long poster board to do three cross-sections of the head. We will refer to these as the "horizontal" cross-sections. STEP 9: You now need to join the horizontal and vertical cross sections to create a shape approximating the volunteer's body. Start at the shoulder and work your way to the feet, then go back and do the head. Have a couple of people line up the three vertical cross sections four inches apart and hold them while you work. Take the shoulder level cross section and locate where it should go across the three vertical ones. Mark the points where they touch with a pencil. Then use the scissors to cut slots on all the cross sections that go exactly halfway across them. The slots should go upward into the horizontal cross sections and downward into the vertical ones. STEP 10: Now slide the slots into each other. They should interlock nicely and you should have three vertical cross-sections held in position by the shoulder level horizontal cross section. Repeat this procedure for each horizontal cross sections at the appropriate level. When done you should have a set of interlocking poster board cross-sections that approximates the shape of the volunteer's body. Wrap the Mummy STEP 11: Flip the cross-sectioned body onto its stomach. Use the masking tape to start covering up the shape. Run the strips from the feet up to the head. Make the strips as long as you can comfortably handle (this is usually two or three feet). Overlap them. Do only the back of the mummy up to its sides. Do not pull the tape tight over the cross-sections. If you do they will distort and you will lose the shape. When the back of the mummy is covered with vertical strips of masking tape (that is strips running from head to foot) flip the mummy over on its back. STEP 12: If any part of the mummy cross-section has gotten distorted during the taping process this is the time to make adjustments. Then start taking sheets of newspaper and crumpling them and stuffing them into the boxes made by the cross-sections. The tape you put on the back of the mummy should keep paper from falling out the other side Do not use too much paper for any one box. Be very careful at the edges of the mummy where the boxes are formed by three pieces of poster board and masking tape. Do not to stuff too much newpaper into those boxes. You want enough to keep the tape from collapsing in between the cross-sections, but not too much to cause the tape to pull away from where it touches the poster board. STEP 13: What you should have at this point is a cross-section of poster boards filled with newspaper with the bottom taped closed so that the newspaper cannot fall out. The newspaper should keep the cross-sections from collapsing and skewing. Now tape the front of the mummy with vertical strips of masking tape as you did the back. Do not try to pull the tape tight, but let it loosely follow the shape of the mummy. This is particularly important where the tape runs down from the toes to the legs.
STEP 15: When the horizontal taping is done, you have your mummy. You may choose to paint it, though the color of masking tape is roughly the color of old mummy wrappings. The example mummy in these pictures was sprayed in places with gray paint to give it the appearance of great age. NOTES: The cross-section technique we used to build the mummy shape is often employed by Hollywood studios to make some of their props. In the film "Jurassic Park," a small clay model of a triceratops was cut into cross sections, then scaled up to larger pieces which were put together to make the full-sized prop seen in the picture. Wrapping a mummy first vertically, then horizontally as you did was a technique used by the ancient Egyptians to make the real mummy wrapping less likely to come unraveled. Unlike our mummy where we just used two layers, real mummies might be wrapped with as many as a dozen layers of cloth. NEXT SECTION: Building the mummy case
Copyright Lee Krystek 2001. All Rights Reserved. |

 This
project requires about 12 hours of work, lots of cardboard,
and about $25 worth of materials you can easily find at your
local hardware or art supply store. Some simple tools are required
including a folding ruler at least five feet long. The following
instructions are a guide, and you may find you want or need
to adjust your approach along the way. Hopefully we can help
you avoid some of the pitfalls. WARNING: This project requires
the use of some sharp cutting tools and a hot glue gun. Children
should only attempt this project under the supervision of an
adult.
This
project requires about 12 hours of work, lots of cardboard,
and about $25 worth of materials you can easily find at your
local hardware or art supply store. Some simple tools are required
including a folding ruler at least five feet long. The following
instructions are a guide, and you may find you want or need
to adjust your approach along the way. Hopefully we can help
you avoid some of the pitfalls. WARNING: This project requires
the use of some sharp cutting tools and a hot glue gun. Children
should only attempt this project under the supervision of an
adult. STEP
6: Use the part of the long poster board that has not been cut
to do another tracing of the person while they are still lying
down. This tracing will start at their shoulder and go down
to their feet. It should represent the height of their body
off the floor not at the mid-line, but about four inches to
one side. If you shifted the poster board because they were
too tall the last time, shift it the same amount this time when
you reach the legs. Cut out what you traced.
STEP
6: Use the part of the long poster board that has not been cut
to do another tracing of the person while they are still lying
down. This tracing will start at their shoulder and go down
to their feet. It should represent the height of their body
off the floor not at the mid-line, but about four inches to
one side. If you shifted the poster board because they were
too tall the last time, shift it the same amount this time when
you reach the legs. Cut out what you traced.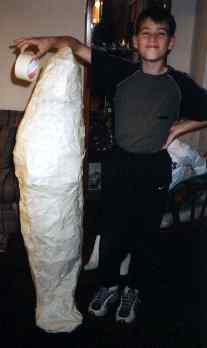 STEP
14: Now you should have a body shape completely enclosed by
vertical strips of masking tape. You will probably have used
up your first roll of masking tape. Next you can start wrapping
the mummy with horizontal strips. You may want to stand the
mummy up and have somebody turn it as you wrap it in one continuous
strip of masking tape.
STEP
14: Now you should have a body shape completely enclosed by
vertical strips of masking tape. You will probably have used
up your first roll of masking tape. Next you can start wrapping
the mummy with horizontal strips. You may want to stand the
mummy up and have somebody turn it as you wrap it in one continuous
strip of masking tape.
|
Related Links |
|
|